{ Description }
The Editor allows you to view & modify your tracked sessions. You can also bring up two recorded sessions side by side for comparison.
Much like the session recorder & viewer, the Editor requires the configuration file in order to load any recorded behavior files. So the first thing it will ask for is a configuration file before it starts. Once you specify a configuration file, you may load recorded events files that were recorded using that configuration template.
Index:
{ Main Form }
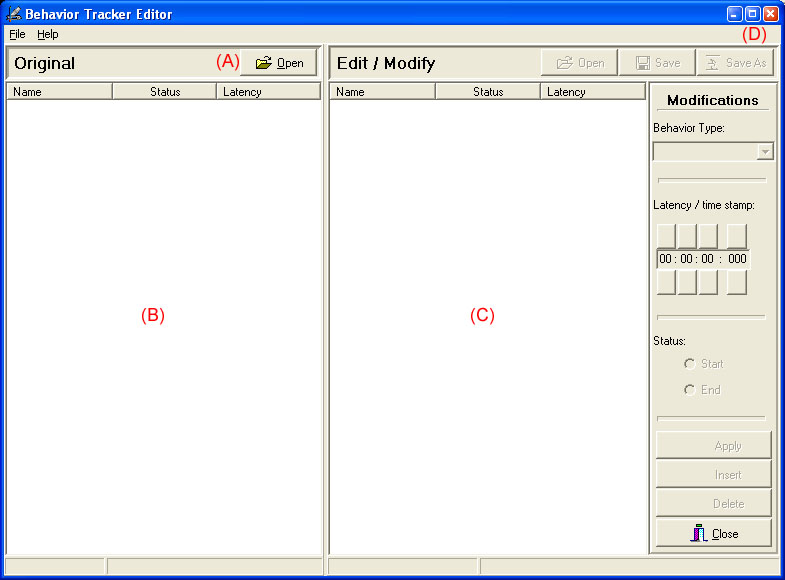
After choosing the configuration file, the main form will appear:
A) The first thing you should do is open a recorded session file. When opening an Events file, it will load the events in that file in both (B) and (C)
B) This area shows the behaviors recorded in the Events file loaded using the (A) button. This area is not editable and is here as a reference of what the original file was before editing.
C) This area is an exact copy of what is (B) after the (A) button is pressed. The information here can be edited however.
D) Remember that if you have a high resolution monitor, you can take advantage of the extra real estate by using the Maximize button.
After opening an Events file using the (E) button bellow, your screen should look something like the following: (Notice that the "Edit / Modify" panel and the buttons in it have become enabled now)
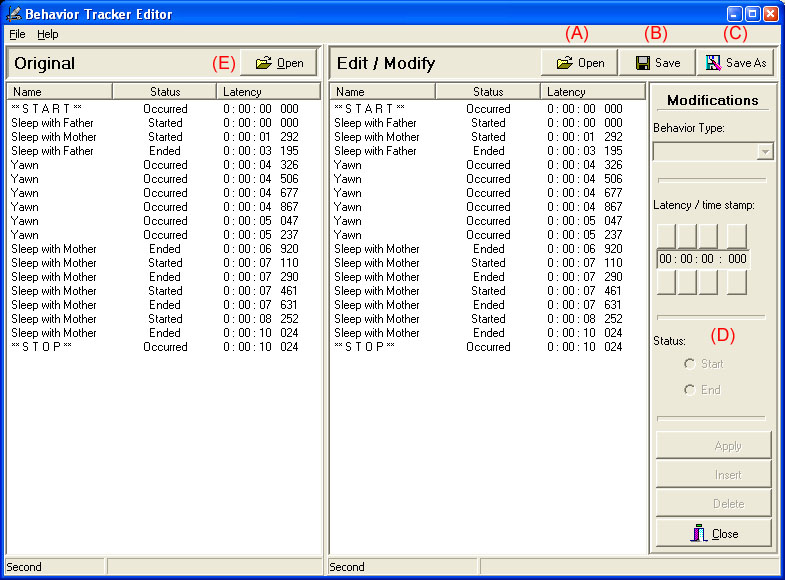
A) This second "Open" button is there only if you wish to compare two Events files next to each other. It will open a different file on the right hand side. So the (E) button opens the same file on both sides for editing while the (A) button opens a second file for comparison (though this second file can also be edited). This can be useful when you want to compare the recordings of two different people on the same observation session.
B) You can save the file at any time (overriding the information it already held) by pressing Save. Notice that Save only applies to what is open in the right hand side (under Edit / Modify). The left hand side is only there as a reference.
C) If you wish to keep the original file intact and save your changes to a different file, use Save As to specify a new file to save to. You will be asked to enter a description. You may keep the original description or type in a new one to be saved with the new file.
D) Notice that the Modifications area is still disabled. This area remains disabled until a behavior is selected on either side. Further more, the "Apply" and "Delete" buttons will be disabled if the right hand side's system events are selected (Start, Stop, Pause, ...) since they can not be edited.
E) Clicking the (E) Open button will open a file on both sides replacing both sides' data with the newly opened file. While the (A) Open button only opens a file in the right hand side.
Note: The editor will not allow you to save a file with unevenly matched start-ends for all behaviors with a duration. So while you are free to edit the file anyway you wish, please make sure that each Start has an End, and vice versa.
{ Editing }
Once a non-system event (Start, Stop, Pause, ...) is selected on the right hand side, the Modifications panel becomes enabled.
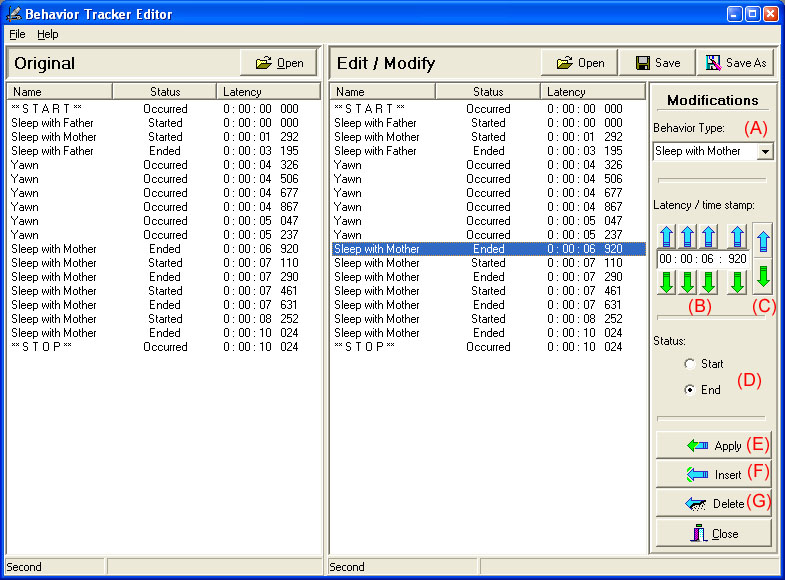
A) Holds the current behavior type. You can change the event type to any behavior specified in the opened configuration file.
B) You can change the time when the event should have been recorded (in case you remember pressing a button a second or two too late). The up and down arrows increase or decrease the corresponding values. The millisecond arrows change the event's time by one tenth of a second increments. Note that you can not change the time stamp to a value greater than **STOP**'s elapsed time value or to less than zero (**START**'s value).
C) While pretty impractical, you do have the ability to change the behavior's time stamp down to the milliseconds using the (C) arrows. It is recommended that you round to seconds or tenths of the seconds for your calculations since dozens of milliseconds could have passed from the time an event occurred till you pressed the button and then a few more pass while the program registers the event depending on your system's speed.
D) You can also change the status flag of behaviors that have duration, indicating their start or end flag. Make sure there are matching starts and ends (and that every start is followed by an end, two starts and two ends in that order are still invalid).
E) Once you are satisfied with your changes, you can press the Apply button (E) to apply the information in the "Modifications" panel to the selected behavior in the right hand side.
F) If you have used (A) through (D) to setup an event that you wish to add to the file, click Insert (F) instead of Apply (E) and the Editor will insert an event with your specification into the right hand side list and select it.
G) Finally, you can select any recorded behavior on the right hand side and click Delete (G) to remove it from the file.
Notes:
After making a selection under "Edit / Modify", you can select a behavior under the "Original" panel. The Editor will remember your selection under Edit / Modify and keep it highlighted. Below we have deleted all behaviors after the last "Yawn" (B) and also altered the last "Yawn"'s time stamp to read 9 seconds after the session start. We have then selected the corresponding behavior on the left hand side (A):
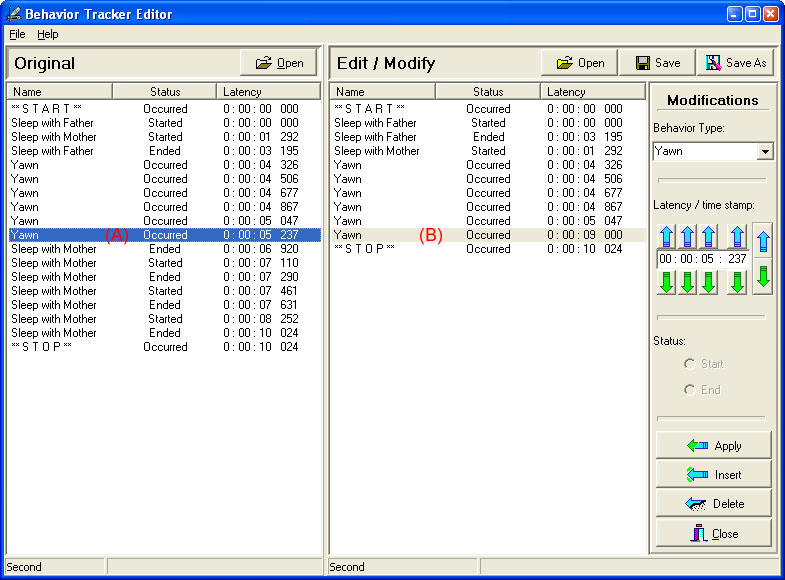
Note that since (A) is selected, the "Modifications" panel reflects (A)'s information. However, "Apply", "Insert" and "Delete" buttons always apply to the right hand side entries. So we can easily restore (B) to its original settings by selecting (A) and hitting "Apply".
Selecting (A) puts (A)'s information in the "Modifications" section and clicking "Apply" applies those values to (B).
The same stands for Insert. We could quickly restore the deleted behaviors by selecting them in the original file on the left-hand-side and then clicking "Insert".