{ Description }
The recorder is used to track the behavior of subjects. It loads a configuration file saved by the "Configure" part of the application and uses it as a template for tracking events. As such, a configuration file is required and is the very first thing the recorder asks for before loading. It is highly recommended that you keep each configuration file in a separate folder along with all of its recorded tracking files.
Index:
{ Main Form }
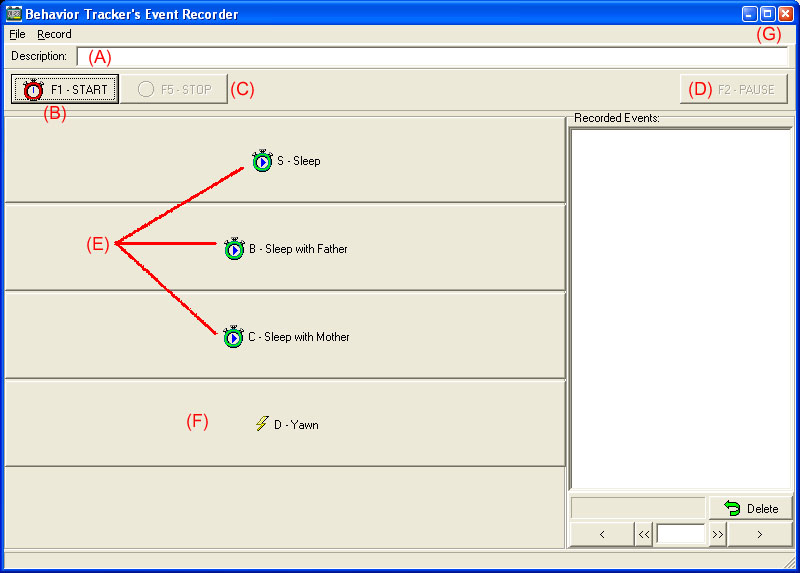
After selecting & opening a configuration file (which you are forced into as you run this part of the application), the main form appears:
A) The description will be saved along with all tracked information in this session. It will by default hold the configuration's description until you modify it. Addendum: Since pressing keys on this form will fire off events while typing in descriptions, editing this field has been disabled. Instead a "Modify" button is added right under (G) to edit the description.
B) The Start button will start a behavior tracking session. Note that you can press F1 (or any key presented on the buttons). You may also use the "Record" menu to perform star, stop and pause operations. If any events with durations have been selected (pressed down) before "Start" is pressed, then they will all start along with the session.
C) Stop will stop a behavior tracking session. If there are any ongoing behaviors, they will be closed at the same time. Note that you may stop a behavior session even if you are in the middle of a pause. It will conclude paused events, if any, as of the paused time stamp.
D) Pauses the session so you can go get a drink. Individual events may not be stopped or started while paused. The starting and ending of pause is recorded as any other event type. So you can later view your data and see how long or how many pauses had been performed at what times. This information is saved only in case you would like to have it at a later point. The program will automatically take the pause duration(s) into account when calculating total session duration and individual event durations so you don't have to, however.
E) Behaviors that were configured as having durations will have a stop-watch icon on their buttons. You can press these keys before the "Start" (B) button to indicate that the behavior was ongoing from the time the tracking session started.
NOTE: For added flexibility (though if it proves more troublesome than useful, this feature maybe removed on later releases), the "Always On" events are NOT automatically started. Also the program would have no idea which one you would rather start off with. Once one of them is started however, they can't all be turned off. So if you require that at least one of such event types in an always-on-mutually-exclusive-group be on the entire duration of the session, then pick/click the appropriate button before pressing "Start" (B).
F) Behaviors that were configured as not having a duration or whose duration is not of importance but frequency is, are represented with a lightning icon.
G) You may change this form's size using its edges or press the "Maximize" button to take advantage of your entire screen (specially if you have many event types). The program will attempt to pick the best number of behavior button columns to accommodate your screen size.
IMPORTANT: The recorder makes sure not to perform any disk or extra operations while tracking a session as they can slow down your PC or delay the capturing of your events and therefore reducing the accuracy of the timestamps (specially on slower PCs). It is very important that you not have other applications running in the background or worse, in the foreground while tracking behaviors.
{ During A Session }
Each event type declared in the configuration file has its own button and key assignment. You can use the mouse or the keyboard shortcuts.
Before starting a behavior tracking session (pressing "Start"), you can press one or more behavior buttons which you wish to start off along with the session. These would be the behaviors that are ongoing when the session starts. In the following screenshot, "Sleep" was selected before the "Start" button was pressed and as you can see in the right hand side grid, its time stamps match the **START** event:
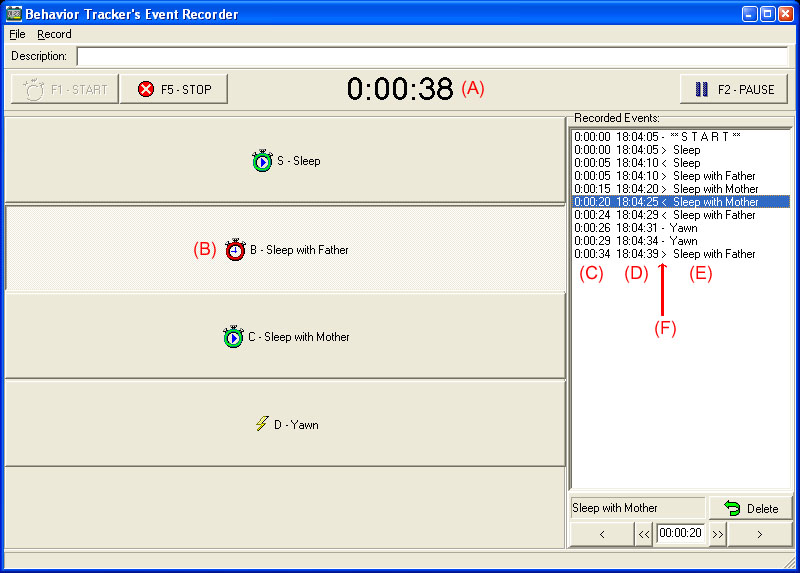
A) This is the amount of time that has passed since the start of the session, excluding paused intervals.
B) This event is currently on or active. The button will stay down for events that have durations until they are pressed again, or a mutually exclusive event starts.
C) This is the hour : minute : second at which point this event was recorded. In the above example, the "Sleep" behavior started at 0 and ended on the fifth second.
D) Each event receives a timestamp.
E) Event's name as configured in the configuration program with START, PAUSE, UNPAUSE and STOP being the the system events.
F) This character indicates the kind of event recorded. ">" denotes the start of a behavior, "<" marks the end of a behavior, and "-" is used for frequency behaviors. So "> Sleep" marks the start of sleeping while "< Sleep" marks the end of this behavior.
Usually the very last event in the list is selected/highlighted. However, at any given time, you can click on a previous event. In the above screenshot, for example, we have selected the end of sleep behavior next to the subject's mother "0:00:20 19:04:25 < Sleep with Mother". Once you have selected an event, you can edit it. Either on go, or you can pause the application and then edit the events. You can even edit the events after you have stopped the session. In case you realize that you pressed this even a second too late or you pressed it by mistake all together. More in this in the next section.
{ Editing An Event }
You can select any of the events you have tracked in order to edit them. Once you have selected an event in the right hand side grid, you can use the area under the grid to modify the event:
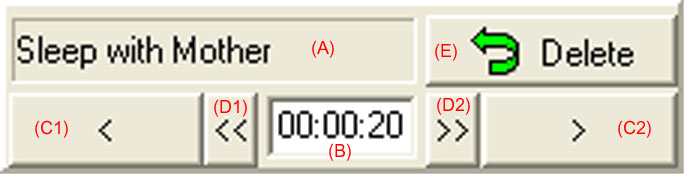
A) This is the name of the behavior that you have selected and are editing.
B) Here is the number of seconds/minutes/hours that had past from the start of the recording when this event was recorded. If for example you realize that you recorded the event a second too late, you can use (C2) to add a second. This will also modify the event's timestamp.
C) You can use these keys to increase or decrease the second at which this event was recorded.
D) You can use these keys to increase or decrease the minutes at which this event was recorded.
E) If you pressed the wrong button or for whatever reason just entered the wrong event, you can simply delete it from the list. Please note that if there is a matching start & end pair of a behavior, "Delete" will delete both events. Finally, "Always On" behaviors may not be deleted from this screen.
{ Stopping/Ending A Tracking Session }
When you are ready to stop the session, simply press the "Stop" button. To make sure you do not forget to save your recordings, the program will prompt you to save the file at this file. You can however cancel and edit the data and then use the menus to save your recordings.
Finally, you can close the application and start again or simply use File/New.
At any point when there is an event selected in the list, you can press the ENTER key and add a tag to that event. A tag or a modifier, is a string or numeric value you add to that event to make it stand out. This can be a note to yourself for later or to make that event stand out from other events of the same kind.
If you are monitoring behaviors that are shared between two or three subject, it is best and easier to create individual behavior kinds for each. ie Subject A smacked subject B, A smacked C, B smacked A, B smacked C, and so on. But what if you are monitoring a subject in a large group of other subjects and the behavior can be shared between all of them? As you can see creating a behavior type for each combination quickly becomes impractical.
In such a situation, you can add a tag to the behavior. Lets say, for example, that you are monitoring subject A and he/she can smack or be smacked by any other member of the community. You can create two behavior types, "Smacked" and "Was Smacked" and lets say you assign keys S and W to them. Now as soon as subject A smacks subject X, you can press S, which enters the "Smacked" event & captures its timestamp and selects it in the right hand side, and then the ENTER key, and type in X's designation (a name, number or both). This creates a sub-category of a behavior type for the "Smacked" behavior. When viewing or exporting the data, all "Smacked" behaviors that have X's tag on them are grouped together into a separate behavior so you can see how many times A smacked X. You can do the same to behaviors that your subject is the receiving end of, like "Was Smacked".
If you made a mistake and want to update or remove a tag, simply press ENTER again to bring up the tag entry dialogue. If you have already passed up the behavior whose tag you wish to change, simply select it in the list on the right hand side and then press ENTER. Tags, like everything else, can be edited in the Editor at a later time as well.
ENTER was selected for tag entry so that you can quickly enter tags by pressing ENTER, then the tag, then ENTER to end the dialogue.
When saving sessions into files, it would be helpful to name the files something descriptive. You can use any legal Windows filename.
If you plan on importing the final results into Sas or other programs which use "space" as the field separator, make sure NOT to use spaces in your file names. You can use underscores instead or use MixedCaseRatherThanSpace.
The above hint also applies to the description. If you plan on reading the description in as a column, you may want to not include spaces in it. Depending on customer feedback, we will likely have more export options in the next release.