{ Overview }
The worksheet window appears by clicking on the "Session Data View / Export" in the Viewer. Here you have a chance to look at your compiled and raw data in a spread-sheet format. Feel free to update or delete any information on this page or add formulas. Anything you change will only be saved with your export or affect the printouts you make from this form. The information will not be saved back into Behavior Tracker.
You can right-click on the sheet to get a formatting menu to setup the page exactly the way you want it before printing or exporting.
Index:
{ Main Form }

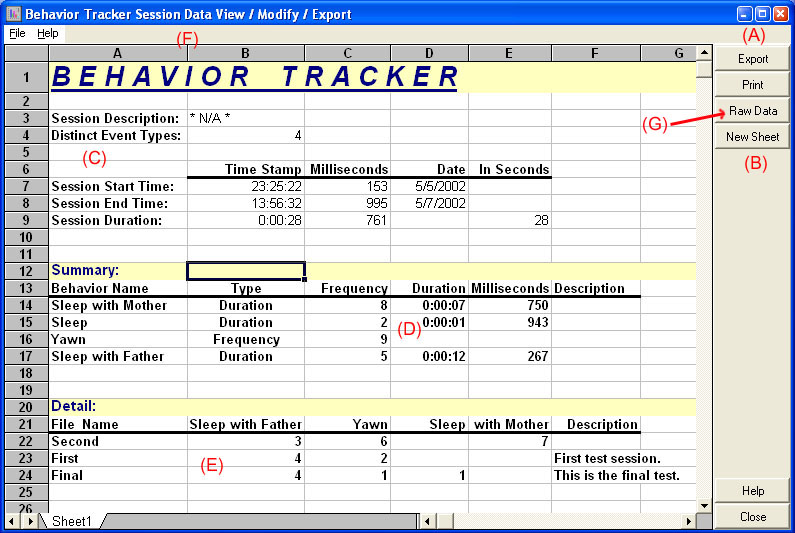
A) The export button pops up a dialog box allowing you to export your data, as is (you may modify, format, delete, or add to it before exporting). It allows exporting to Microsoft Excel 4 & 5 as well as two text based formats. Finally, it allows saving in two Formula One formats.
B) You can add sheets in which you can add custom data or formulas. These sheets will be exported along with the main sheet.
C) This area closely matches the main screen of the Viewer. It has information about all the data brought here as a whole (in this case from three files). The only additional information is the milliseconds. All basic time related values recorded in Behavior Tracker are recorded down to the millisecond. Note that "Session Duration" is also provided in seconds to allow easier calculations. You can, for example, enter: =(C15/E9)*100 in the cell E15 and then format it (using the right mouse click's popup menu) to get the percentage of that behavior's duration in relation to the total duration.
D) The summary area has similar information as the main screen of the Viewer's Data List tab and is a compilation of behavior data in all files. Duration is in seconds. Note however that the total is calculated using milliseconds. So if you have an asleep event of 4.678 seconds and one of 1.444 seconds, the duration shown here will be 6 seconds. So the calculations are done first and then rounded to preserve more fractions rather than the other way around.
E) The Detail area breaks the gathered information by session (rows) and behavior (columns).
F) Note that you can resize the columns using the separators in order to fit long behavior names.
G) Creates a spreadsheet of individual observation records for the file(s)/session(s) there were selected in the Viewer. An example of the raw data can be found further down on this documentation or by clicking on this link.
NOTE: As you can see in the (E) area, the fields that do not have any data are blank. Due to the fact that some programs like SAS do not recognize a space as a field, the empty cells have been converted to formulas. All empty cells in the (E) area point to B12 (the selected cell in the pictures above). So if you put a period (.) in B12, for example, then all empty cells in the (E) area will have a period in them instead. This will help SAS recognize them as empty fields upon a text export. You can also put a zero or anything else you wish in that cell to accommodate your export.
{ Formulas }
All formulas must start with the equal sign (=).
Numbers in formulas can be followed by a percent sign (%). Numbers with trailing percent signs are treated as percentages (e.g., 100% is evaluated as 1).
If text is encountered when a number is expected, the text is converted to a
number. For example, the formula 1 + "3" returns 4, because "3" is converted to
a number. If the text cannot be converted to a valid number (e.g., 1 + "Text"),
#VALUE! is returned. Likewise, if a number is encountered when text is
expected, the number is converted to text. The formula "The number is "&3
converts to the text string "The number is 3".
The value TRUE always converts to 1; while FALSE converts to 0. If a number is
encountered when a logical value is expected, a zero is converted to FALSE. All
other numbers are converted to TRUE. If text is encountered when a logical value
is expected, "TRUE" is converted to TRUE; "FALSE" is converted to FALSE. All
other text returns #VALUE!.
Dates and times are recognized and converted to their serial values. For example, "10/10/94" - "10/1/94" equals 9.
| Operator Type | Operator Description |
| +, -, /, * | Arithmetic operations |
| % | Percentage |
| ^ | Exponentiation |
| Text & | Concatenation |
| =, >, <, >=, <=, <> | Equality operators |
Range operators :, .., .
produces a reference that includes all the cells between the two references
(e.g., A1:A5 includes cells A1 and A5 and all cells in between).
Union operator Comma (,) produces one reference that includes the two
references (e.g., A1:A10,C1:C10).
{ Cell References }
A reference identifies a cell by referring to the row and column coordinates of the cell. References are based on the row and column headings. For example, A1 refers to the cell at the intersection of row 1 and column A. References can be used in formulas to access data from a worksheet.
A range of cells is specified by placing a colon (:) between two cell references. For example, the reference A1:C3 refers to the range anchored by cells A1 and C3. The range includes all cells in columns A, B, and C of rows 1, 2, and 3.
There are two types of cell references - relative and absolute.
References can be part absolute and part relative. These are called mixed references. The following table lists the reference types.
The reference operators can be used to specify multiple ranges in the same reference. For example, A1:C1,A10:C10 specifies the three cells A1, B1, and C1 and the three cells A10, B10, and C10. The formula =SUM(A1:C1,A10:C10) adds the values in all six cells.
To reference a different worksheet, use the following syntax: Sheet3!A1
You can also refer to multiple worksheets, or ranges in multiple worksheets.
The following example references cell A1 in Sheet1 and cell A1 in Sheet2.
Sheet1C:Sheet2!A1
Important: Worksheets must be referenced in index order. For example, the
reference to the sheet indexed 1 must come before the reference to the sheet
indexed 2. Remember that the worksheet index is usually different that the sheet
name that appears on the sheet tab. Worksheets are indexed from left to right,
beginning with 1.
The following syntax references the range A1 to B2 in Sheet1 and the range A1 to
B2 in Sheet2.
Sheet1:Sheet2!A1:B2
Cell references can be automatically entered as you enter a formula.
To automatically enter a cell reference:
1. Enter the formula to the point of the range reference.
2. With the mouse, select the cell or range you want to reference.
The reference of the range you select is automatically placed in the formula.
When you enter a cell reference in this manner, a relative reference is assumed.
{ Raw Data }
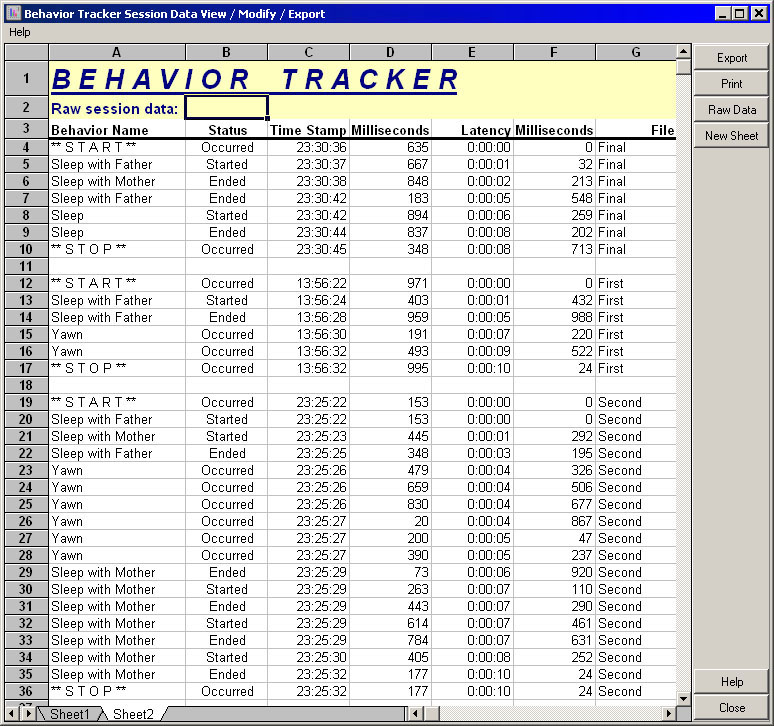
Depending on the end user's application, the 'detail data' or the 'raw data' are generally the most useful part of this application since most users will want to take this information and export it to SAS, Excel or other applications for further analysis. The detail information is on "Sheet 1" (selectable on the bottom left) as we saw earlier in this documentation and the raw data is on this page ("Sheet 2") which was generated by clicking the "Raw Data" button (which can be clicked again to create multiple sheets of this data for further manipulation before exporting).
You can reach the raw data for exporting or printing by opening the View program, clicking on the "Session Data View / Export" button (near bottom right), and then the "Raw Data" button (near top right) to reach this page.

In our example, we had selected three session file (First, Second and Final) in the Viewer before clicking the "Session Data View / Export" button so the data from the three files are displayed one after the other. Clicking Export here or in the previews screen will prompt you to select an export format and will then create a file containing this data for you to open or import to other applications.
Please note that the "Export" button does not function in the trial version of the application and will remain disabled until you have purchased the software. You can, of course, export session data that you had recorded before registering once you have registered (once registered, the export works on pre-registration sessions also).